Kill Team Guide: Understanding Space Marine Tactics
We’re kicking off our look at the Space Marines by analysing
their tactics first, before we get into speaking specific units. I’ve written
way more than I intended to on this topic, so settle in!
 The tactics for the Space Marines fall into two general categories:
general ones usable by anybody and model specific tied to a particular model.
Whilst it might look like they have more Tactics than other factions on the
surface, the majority are quite situational, and you’ll probably be looking to
use the Basic Tactics first.
Thanks for reading.
If you liked what you saw, and you want to help out, please leave a comment. Sharing this with your friends, and following me on Twitter, Facebook or Google+ would also be hugely appreciated.
If you have anything you want me to look at, let me know in the comments below. I'll probably be able to write an article about that topic within a day!
If you want to support me directly, use the affiliate links below. I get a small percentage of purchases you make her, and you get cheaper miniatures! If you really love what I do here, you can make a one off donation at my PayPal, or become a true hero to table top education and make a regular donation to my Patreon. Every Little helps!


 The tactics for the Space Marines fall into two general categories:
general ones usable by anybody and model specific tied to a particular model.
Whilst it might look like they have more Tactics than other factions on the
surface, the majority are quite situational, and you’ll probably be looking to
use the Basic Tactics first.
The tactics for the Space Marines fall into two general categories:
general ones usable by anybody and model specific tied to a particular model.
Whilst it might look like they have more Tactics than other factions on the
surface, the majority are quite situational, and you’ll probably be looking to
use the Basic Tactics first.General Tactics
- Tactic: Death to the Traitors
- Use when you select a model to fight in the Fight phase
- To hit rolls of 6+ result in an extra attack against that model
- Only useable against Heretic Astartes
- Cost: 1CP
This is a similar, more restricted version of the Zealot
tactic. I’ve gone over that one already in the Zealot specialisation post and
the same criticism applies here. It’s not one I’d spend precious CP on, unless
I had tooled up a Marine to kick out half a dozen attacks… and even then there’s
a much better use for your CP.
- Tactic: Armour of Contempt
- Use when a model from your Kill Team takes a Mortal Wound
- Ignore that wound and any other on a 5+ save
- Lasts until the end of the phase
- Cost: 1CP
Good defence against psykers, and potentially worth it
against Grey Knights and Thousand Sons, who are the only two Psyker factions in
Kill Team thus far (Farseers and Warlocks being far too precious to sign up for
suicide squads).
There are other ways of generating mortal wounds, and it
might well be useful using your CP to defend against them. Be aware that the Tactic
lasts until the end of the phase, meaning that you’ll have to re-spend CP if
the enemy has multiple phases in which they can inflict Mortal wounds.
I think using CP on this is really a secondary objective,
and that you’re better off spending it elsewhere. This is a panic button if you
have a model that absolutely must survive, but since you only have 1/3 of a
chance of nullifying the mortal wound, I wouldn’t count on it.
- Tactic: Honour the Chapter
- Use this at the end of the fight phase
- Pick a model from your Team to fight again
- Cost: 2CP
Yes please.
If you’ve tooled up a model to be a melee beat stick, then
this will literally double their effectiveness. To give you an example; a Combat
Spec Reiver with a knife can put out 8 attacks a turn! And that’s a mild
combination (Intercessor Sergeant with a power sword being a particular favourite
of mine!).
Sadly any game breaking combinations are broken up by the
ruling and the specialisms Space Marines can have. This Tactic would have made
the Zealot very viable indeed, as they would reliably buzz saw down their opponents
in one turn and be able to charge in the next keeping up their Specialisation
ability. Sadly Marines cannot be Zealots (so clearly Black Templars don’t form Kill
Teams).
The best combination from the Combat/Leader combo is not
possible. The idea would be to use the Leader/Combat combo described here, and
then follow up with a second round of fighting from your combat guy. Unfortunately
this Tactic needs to be used at the end of the Fight phase.
This is a great Tactic though and keeps your opponent on
their toes. Even after your initial close combat onslaught, provided you keep
your CP in your pocket, you can have another round of glorious fighting.
Model Specific
- Tactic: Hellfire Shells
- Use this when a model shoots with a Heavy Bolter
- Fire one round, and if it hits causes d3 Mortal Wounds
- Cost: 2CP
Nice. Space Marines lack any access to psykers this tactic
gives them the easy way into Mortal Wounds. Expensive at 2CP, but thoroughly
useful in Kill Team, where just one Mortal wound at the right time can be
painful!
- Tactic: Masterful Marksmanship
- Use when an Intercessor fires a Stalker bolt rifle
- Add 1 to Hit and 1 to Wound for that model
- Cost: 1CP
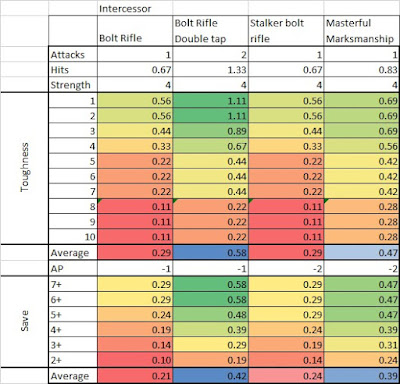
A long time ago I wrote about Stalker Bolt rifles and how
they were pretty terrible compared to the other options. You’d think this Tactic
would make them viable compared to the other bolt rifle options.
Let’s see!
Nope, still not as good. There are niche applications for
this, but a double-tapping Sniper or Demo Spec using their own Tactic
outperforms the Stalker Bolt Rifle if they’re using the standard bolt rifle. Okay
the difference is not so great, but you’re paying 1CP to be similar to a normal
shot.
Standard bolt rifles can also move and fire without negative
modifiers, can split fire in a pinch, and the big application of AP -2 is
against 2+ save models… which is just Rubric Marines I think.
Not a great investment of CP, and I still have yet to find a
use for Stalker Bolt Rifles that seems useful in any game.
- Tactic: Shock and Awe
- Use this when a Reiver attempts a charge
- Fire a shock grenade before any Overwatch.
- Target may not fire overwatch, and suffers the effect of the shock grenade
- Shock grenade effects: Cannot be readied, fire Overwatch and -1 To Hit rolls
- Cost: 2CP
A high cost but for a good reason. Firstly, this is one of
the only ways in which to fire a weapon whilst charging in Kill Team. That
alone would make it a worthwhile Tactic.
Secondly it negates Overwatch, meaning those flamer guys
with their automatic hit weapons are feeling fairly silly. This means both a safe
charge, and even if the charge fails a friend can follow up.
Thirdly, it’s a -1 to Hit, which means a safer combat for
your charging Reiver, or less repercussion if he fails his charge and ends up
dead to rights in the enemy iron sights.
Fourthly, the model can’t be readied, which means you can
maybe gun the guy down with squad mates before anything bad happens to a Reiver
that failed his charge.
Fifthly, this grenade is thrown in the Movement phase… which
means you can fire another grenade in the Shooting phase! The rules for grenades
state that you can only use them once per phase, not battle round (which is a
nifty trick to remember if you want to use a grenade for overwatch).
Sixthly, now you’ve just realised you can use grenades in
Overwatch… mostly a trick for Guardsmen to get extra shots, aeldari to abuse
their plasma grenades, and genestealer cultists to cackle in glee when they throw
a demolition pack into the face of a charging astartes.
A wonderful tactic, and one to remember.
Suggestions
In the Schools League you’re only allowed to pick 5 Tactics,
and honestly only one or two of these will probably make the list. Of the list
above, I would only recommend taking this above the basic or specialist
tactics:
- Honour the Chapter
It’s a useful Tactic in pretty much any Space Marine Kill
Team, as you are guaranteed to have at least one useful melee character in the
Sergeant. The next two recommendations are if you take specific models:
- Shock and Awe (Reiver)
- Hellfire Rounds (Heavy Bolter)
These two are solid buffs to your Kill Team, depending on
what models you’d like to field. That’s not to say you shouldn’t take the
Stalker Bolt Rifle with a Sniper specialisation if you really loved the idea. The
number difference is teeny tiny compared to the “optimal”, and player ability
makes up for more than you realise.
One I would take if you have a slot spare would be the Armour
of Contempt. As I said, it’s a decent panic button to hit if you find yourself under
fire from plenty of mortal wounds.
Okay, I’ve written roughly two and a half times what I
wanted to today. Have a nice weekend everyone!
Until next time!
Thanks for reading.
If you liked what you saw, and you want to help out, please leave a comment. Sharing this with your friends, and following me on Twitter, Facebook or Google+ would also be hugely appreciated.
If you have anything you want me to look at, let me know in the comments below. I'll probably be able to write an article about that topic within a day!
If you want to support me directly, use the affiliate links below. I get a small percentage of purchases you make her, and you get cheaper miniatures! If you really love what I do here, you can make a one off donation at my PayPal, or become a true hero to table top education and make a regular donation to my Patreon. Every Little helps!


Comments
Post a Comment