Warhammer 40K Patrol Detachment Tactics Guide
Do you know what to do with your models once they hit table top? You may know general strategies, but the actual placement and movements of models is not always clear. Would you like to know more? An intellectual and successful general like yourself probably would!
I've written (perhaps far too much!) on how to build an army for patrol detachments. I've based this off my experience in teaching student neophytes how to play 40K in my school club, and believe me when I say I've seen most of the (literal!) school boy errors out there.
A lot of guides on how to use models focus on specific units. Having done that myself, I know how easy it is to fall into the trap of thinking you know how your army works based on a thorough understanding of the unit itself. But knowing the strengths ad weaknesses of a particular unit won't help you to understand where to put them on a battlefield.
So let me give you some general guidelines.
Time for the caveat... all situations and armies are different, and you will need to think about how these guidelines apply to you. This is a game, and fun should take priority over winning. Hopefully I can help you make your games more fun by putting in some clever tactics. Also remember, people on the internet are always wrong, particularly teachers with blogs.
 |
| In case you forgot the required units! |
TL;DR Overview
This guide is based around the 4-unit structure outlined here. Then do this with them:
- Troops move towards objectives, using cover and firing on other enemy Troops.
- Fire support units move to convenient fire positions, and take out key targets.
- Skirmishing units head to the front to disrupt the enemy.
- Leader units position themselves to best support the patrol.
As a rule of thumb, you should keep your army together as one cohesive whole. Since blast templates are gone, you can do this without risking too much area of effect damage. Moving as one group means that you can easily support each other as you move toward objectives. Assaulting a big mass of Space Marines is a scary prospect, as opposed to charging an isolated unit of Intercessors.
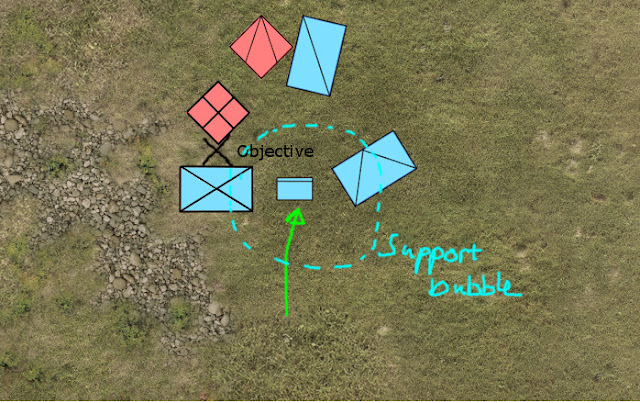
Standard deployment will look something like this, with the Troops and Skirmishes flanking the Fire Support. This means that any first turn alpha strikes won't take out your valuable units before they have a chance to be used in battle.
Troop Tactics
Troops will move towards objectives. That is their purpose. If they get bogged down attacking another unit, then your army's momentum has stalled an you risk losing the chance to claim the objective.
Regardless of the unit you use, you should always be trying to move from cover to cover. Whilst it may not seem very brave of a Space Marine, a power armoured giant in cover is effectively a terminator. Keeping your Troops alive until the end of the battle is important, as a single Guardsman surrounded by Thunderwolf cavalry still scores the objective.
Troops shoot at other enemy Troops. Their weaponry is usually not strong enough to deal significant damage to anything, and wearing down the enemy ability to score objectives is worth more than shaving a wound off a Leman Russ tank. There's also the fact that your Troops will end up face to face with the enemy, as they contest an objective!
Which brings us to the next, contentious point. Any Troop choice will be expected to get into close combat. Even T'au. If you are sitting on an objective the enemy will want to sit on it too. Which means that they will sit on top of you to contest it.
You will also move on to an objective to contest it... including T'au Firewarriors. Obviously assaulting fresh unit of Ork Boyz would be suicide, but you will have been wearing them down with your superior shooting for the turns it takes you to get to your objective. And remember, if you get the charge, then you hit first. That counts for something!
There are some more nuanced tactics you can use for this, such as advancing beyond an objective to fall back on to it later, but that is a discussion for another time. Or in the comments below!
Fire Support Tactics
Your Fire support units are all about finding good firing lines to reduce the effect of cover, and maximise how much impact they have. This will often mean moving to the flanks to shoot around walls and trees.
Try to keep pace with your Troops, as they will be able to support you in the event of something bad happening. Again, keeping our army together turns individual units into one large monster the enemy has to del with. This won't always be possible, as in the case of static heavy weapons teams, so they'll need to be given a really good position to affect the hole of the battlefield, and may even be left behind. Avoid static teams if you can for Patrol Detachments, as it makes it more difficult for your army to support each other.
Skirmishing Tactics
Leader Tactics
Keep in mind that your leaders are Force Multipliers, and they make every other unit in the army better by their presence. Charging head long into the enemy guns for glory make sound good on paper, but the reality tends to be disappointing as they vanish under deluge of failed save rolls. Don't be afraid to expose them to danger, but make sure you do it when it counts.
Conclusion
Theses are guidelines rather than hard rules. At the end of the day, we're playing a game. The Ork Warboss charging an entire Imperial Guard tank line is right and propa', but don't have unrealistic expectations about what will happen to him. My intention here is to help you get more enjoyment from games by understanding what's happening in front of you, rather than be at the mercy of the dice gods.
To give a painting analogy: you can have fun flinging paint at a model, and even find the mix of colours fun. But you get a much more rewarding experience from following advice and learning techniques.
Writing this was a lot of fun, but I have to admit I don't have a huge amount of experience in larger scale battles yet. The ideas here may scale up well, but hopefully people can leave me some comments saying if the game completely changes with larger armies.
Thanks for reading.
If you liked what you saw, and you want to help out, please leave a comment. Sharing this with your friends, and following me on Twitter, Facebook or Google+ would also be hugely appreciated.
If you have anything you want me to look at, let me know in the comments below. I'll probably be able to write an article about that topic within a day!
If you want to support me directly, use the affiliate links below. I get a small percentage of purchases you make her, and you get cheaper miniatures! If you really love what I do here, you can make a one off donation at my PayPal, or become a true hero to table top education and make a regular donation to my Patreon. Every Little helps!


Really enjoy your articles, thanks. Keep it up!
ReplyDeleteGlad you like them! And thanks. Comments like yours really do make my day.
DeleteThanks for this - I've been looking for some simple tactical advice, your blog fit's the bill! Can't believe GW don't publish more of this sort of thing themselves, but thanks for taking the time.
ReplyDeleteYou're welcome and thanks in return for the comment! They used to publish little pieces of tactical advice in the faction codex (where the infamous T'au Kauyon and Mont'ka tactics come from).
DeleteGames Workshop usually write about interesting and fluffy tactics that get models killed, as opposed to boring, predictable but effective ones. Bearing in mind that 40K is more like a fantasy role playing game than a straight up war simulator, there's nothing wrong with that!