Painting Guide: Blood Angels, perfecting the colour scheme
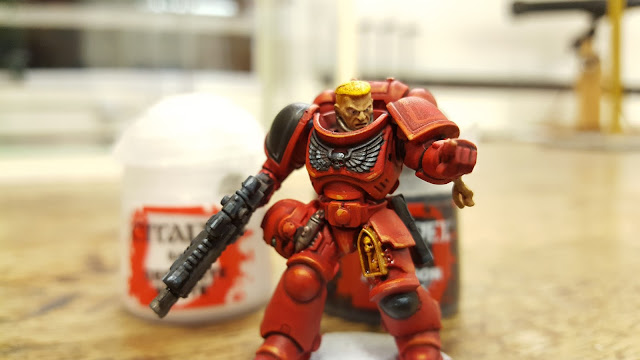
What I've done here is nothing more than the standard Games Workshop recommended paint scheme, with some tweaks and tips to get to that 'eavy metal stage. I often see people copying what comes out of the Citadel Paint App or Duncan's videos, and never quite getting these results (usually darker without as much shiny quality to the armour). There are some really simple things you can do to get that gloriously bright, blood red to terracotta armour.
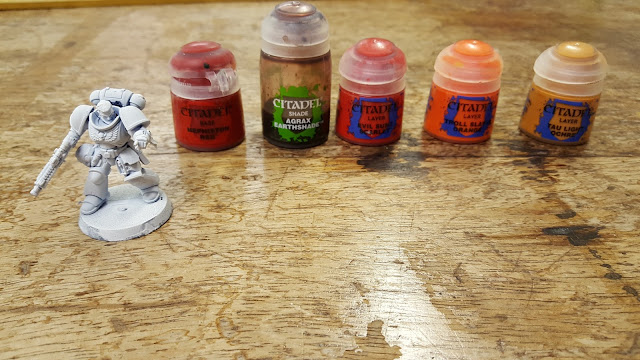
Starting with:
Step 0: Don't forget to thin your paints with a little bit of water.
Step 1: White Undercoat
Some guides suggest you can go with a black undercoat, but the resulting red is always darker than what you want. I haven't experimented with going straight to a red undercoat, but there are some parts on this model in particular that we want to under coat in white anyway.
Step 2: Basecoat
No surprises here, go with Mephiston Red. Go with two or three thin coats to build up that nice solid and smooth colour. Spend a bit of time getting this right, as we're going to be leaving this as the actual colour for the armour, and not messing around with it too much.
This is perhaps where a lot of painting guides fall down. When this colour goes onto a white under coat it comes out as a nice bright red. If you start with a black or grey undercoat, you tend to get a darker colour, despite Mephiston Red having quite a strong pigment as a base paint. Then they start to over correct with layer paints or tricky highlights (I've even seen people desperately wet blending into orange to get this right).
Step 3: Shading
Agrax Earthshade as a pin or recess shade works really well here. You don't even need to be all that careful with it, as the brown blends quite well with the red.
It can be a little time consuming to do shading like this, which is why I've always been lazy and done all over washes with Carrabourg Crimson. Whilst that gives a really nice dramatic red (like with my Remembrance Day Poppy holders), it's rather dark. It's also a pain in the neck to repaint all those panels in Mephiston Red. Take your time doing the pin wash, it's easier in the end.
Step 4: First layer Highlight
Now we add a layer of Evil Sunz scarlet, running around the edge of the armour panels and any curved surfaces. It goes on brighter than it dries, so don't worry if it looks like your lines are standing out too much.
The first tip at this stage is paint a line around the inside of the shoulder pad, just beyond the shadow. Due to the way light reflects on curved surfaces, this mimics a nice generic light source.
The second tip is to not bothering highlighting parts of the model pointing at the ground. Save yourself some time, since these parts shouldn't be reflecting light anyway.
Step 5: Second layer Highlight
Games Workshop recommends Fire Dragon Bright, but I've found this to be a bit too pale as a highlight. I go with Troll Slayer Orange. it has a touch more red to it, making it transition from Evil Sunz Scarlet more easily.
It's not because the paint budget has run out for my club, and I can't afford to get a pot of Fire Dragon Bright...
The top tip here is to only highlight two things:
- The centre of long panels (like the top of the knee ridge or the middle of the stomach plate under the Aquila)
- The corners where two first layer high lights meet.
If you find yourself spending forever on this stage, you've probably added too much. This took about two minutes for me, and one of those minutes was just thinking about where to put the paint.
Your rank and file troops can pretty much stop here. But if you want to push that extra shine, then...
Step 6: Final Spot Highlight
Tau Light Ochre. Seriously. It's a very light, orange-ish brown, and it works fantastically well as a final highlight.
This takes seconds, and its tiny spots or grazes of paint to the extremes of what you highlighted earlier; the centre of long panel edges, or corners where two lines meet.
Here's where you can get proper arty though... if you decide to have a dynamic light source, you can have your highlights all line up leading to where that light source should be. See below to see how the foot highlights are slightly off centre to create this effect.
 |
| Close up shot |
Step 7: Black armour parts
Abaddon Black to areas of the armour you want to be black. I didn't plan this well, and I'm painting over some of the highlight work I've done. Of course, you can save yourself some time by not highlighting those areas.
Strangely enough, you will need to put on the black in two thin coats. Red pokes through the black quite obviously, and you'll want to make sure you have a solid colour.
Step 8: The rest...
I kind of hate it when painting guides go from the big obvious parts of the armour to a fully painted model in one edit, but in this case it's somewhat true. This can take a bit of time, but we're not going into the same level of detail as with the armour.
This is not because we're lazy (at least not entirely), but because the red really is the star of the model, and we want people to notice that instead of a really well painted purity seal.
In short:
Retributor Armour: Gold bits
Abaddon black: Leather and pouch bits that should have been done in the previous stage...
Leadbelcher: Metal bits
Zandri dust: Paper bits
WAAGGHH!! Flesh: Lenses and optics (trust me, they clash against the red well)
Averland Susnset: The gorgeously angelic blonde hair gifted to the BAngels by their actually-an-Angel Primarch.
Ushabti Bone: The skin (although you can leave this white for a similar effect)
Most of these paints can be found in the standard starter paint set, so it's not too hefty on the budget.
Step 9: Black Highlights
Dark Reaper highlighting the black with the same tips as Evil Sunz Scarlet before. Try to keep your lines thin for this though, black is a little more unforgiving in terms of highlights than red. Don't be afraid to go back to black to tidy up any lines that are too thick.
Fenrisian Grey goes on as a spot highlight.
Step 10: Washes
Washes rather than shades, as we're just covering all the other parts we've done before:
Nuln oil: Any part of leadbelcher, and a little on the WAAAAGGGHH flesh if you want some contrast.
Reikland Fleshshade Gloss: For the gold.
Reikland Fleshshade: The yellow, the paper parts and skin.
This essentially completes the model. The Fleshshade does all the work in making the skin and hair look natural, and you really don't have to more than that.
The only other thing we need to do is white and black for the eyes. Sadly there's no real tip for this, other than having a really pointy brush and some patience. The eyes took me about three or four goes to get right in the end.
At this point you could also put a dot of Ceramite White on the lenses and glass parts of the model:
Step 11: Basing
Base however you like really. I've really converted to the new texture paints Games Workshop has. They make some really nice looking bases without too much hassle. The model below has Agrellan Earth along with some static grass and a grey paint around the rim.
Until next time!
Thanks for reading.
If you liked what you saw, and you want to help out, please leave a comment. Sharing this with your friends, and following me on Twitter, Facebook or Google+ would also be hugely appreciated.
If you have anything you want me to look at, let me know in the comments below. I'll probably be able to write an article about that topic within a day!
If you want to support me directly, use the affiliate links below. I get a small percentage of purchases you make her, and you get cheaper miniatures! If you really love what I do here, you can make a one off donation at my PayPal, or become a true hero to table top education and make a regular donation to my Patreon. Every Little helps!


Great write-up and guide. Thank you.
ReplyDeleteMy pleasure and thank you for commenting! I hope it helps, and if you come back in a few days time you can see a complete beginners guide to the Blood Angels!
DeleteHighlight placement is excellent! Nicked! :)
ReplyDeleteHello! Awesome painting guide thank you.
ReplyDeleteQuestion though... do you paint tanks the same way?
Exactly the same way, although sometimes I'm lazy and dry brush the Evil Sunz scarlet highlight. Not the other highlights though, I take my time with them.
DeleteThanks for commenting and sorry for the late reply.
How would you recommend getting the eyes on a helmeted marine done? Also what colour did you do holster for the weapon on the belt? Great guide tho thanks a lot!
ReplyDeleteThanks for commenting! To answer your question, do the lenses first before the highlights on the helmets, but after you've done the shading. Then you can repaint over your mistakes with the original base paint without redoing too much. I try not to do too much with them; base paint, wash and a white dot tend to do all you need.
DeleteBut you'll have to balance that with your technique. Dry brushing highlights on the helmet after you've done the lenses is going to obliterate the work you've done. The way around that is just to make peace with the fact you are always going to have to highlight around your eyes and lenses manually without the cheat that dry brushing allows you.
Also the holster was black... you could go brown, but it's generally not worth buying a whole new paint for just one detail.
The left shoulder pad should be black too.
ReplyDelete
ReplyDeleteAn interesting blog, feel free to visit https://najlepsze-seo.blogspot.com