Painting Guide: Space Wolves, an alternative colour scheme
I, like most neck beards, have a big soft spot for the Space Puppies.
Whether you consider them to be space werewolves, space Vikings, or people who just really like wolves and alcohol in space, they are one of the few factions in 40K who realize they're in a fantasy genre. Yes, riding a 10-foot high wolf into battle is ridiculous, but it's awesome at the same time!
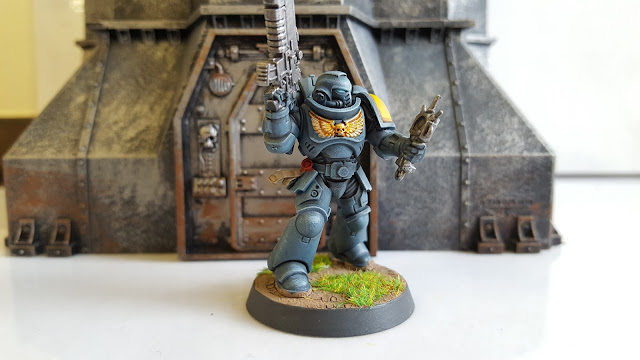
I'm not a huge fan of the light blue armour though. I think it lacks the grit that the Sons of Russ are famed for. I also think the Horus Heresey grey is boring, so I've been looking for an alternative. Whilst doing my T'au Mu'gulath Bay Avengers, I found the above!
The grey here is really dark blue, brought up to typical Space Wolf Fenrisian grey. It was also really quick to do, the whole thing taking about an hour including drying time for the basing material.
Step 1 - Base Coat
Dark Reaper is our first paint, over an undercoat of Mechanicus Standard grey. You can get away with one coat of paint at this stage, but your best results will always be two thin coats (after saying your incantation to Duncan).
Step 2 - First Wet Brush
Next is a wet brush with Thunderhawk Blue. Wet brushing is the same as Dry Brushin, only you have a little more thinned down paint on the brush. In retrospect, this stage is probably best after the shading step, but I wanted to check if it had enough depth without it.
It was alright, but Thunderhawk Blue and Dark Reaper are remarkably close together in terms of colour. There was enough difference for a first layer of highlight, but not enough to clearly define recesses.
Step 3 - Recess Shading
A pin wash of Nuln Oil to all the deepest recesses. If you were careful enough with the wet brushing, you can get away with not washing all the cracks, and just focus on the deepest crevices.
Something I added later was a further two washes to the softer parts of the power armour. Being a lazy teacher (the best kind), rather than painting black and high lighting up I prefer to wash down for minor details.
Step 4 - Light Dry Brush
This was a light dry brush with Fenrisian Grey... a very light one. Since Fenrisian Grey is so much brighter, you only need a small amount to make a difference. If you wanted to have an easier time of it, Russ Grey instead, and save Fenrian as a final edge highlight.
Step 5 - The other details
Basically just showing off the shading on the power armour at this stage. Block in your other details, shade and high light as appropriate. When I looked at the model I thought the highlights didn't really stand out on the power armour, so I added another edge high light of Fenrisian Grey, focused on key points.
he shoulder pads are just Averland Susnset and Khorne Red, recess shaded with Nuln Oil and Agrax Earthshade respectively.
I also tested out the Citadel basing texture paints:
This is Agrellan Earth... looks like wet mud going on, and looks like dried mud once it's dry. Really clever really, and I'll be adding splodges of this to my existing bases to enliven them up. A splash of bright green static grass after drying works well against the darker power armour.
The bolter is the standard Leadbelcher-Nuln Oil-Bright silver dry brush gun metal. The eyes are done with Baharroth blue and a single dot of White Scar. The gold is Retributor-Armour, gloss Reikland Fleshade and Stormhost silver drybrush.
Looks good and quick to do. Is that enough to get me collecting Space Wolves? Sadly, the wallet and club budget says no...
Until next time!
Thanks for reading.
If you liked what you saw, and you want to help out, please leave a comment. Sharing this with your friends, and following me on Twitter, Facebook or Google+ would also be hugely appreciated.
If you have anything you want me to look at, let me know in the comments below. I'll probably be able to write an article about that topic within a day!
If you want to support me directly, use the affiliate links below. I get a small percentage of purchases you make her, and you get cheaper miniatures! If you really love what I do here, you can make a one off donation at my PayPal, or become a true hero to table top education and make a regular donation to my Patreon. Every Little helps!


Comments
Post a Comment